Tuesday, September 27, 2011

Fried Ravioli

My husband is gone this week for work.  Since he is gone that means easy dinners for the kids and I.

One of these quick and easy meals is Fried Ravioli.  It's really not meant to be a meal but my kids love it so it works for dinner when it's just us. 

This couldn't be more simple.

Frozen Cheese Ravioli
Italian Bread Crumbs
1 Egg
1/4 cup of Milk


Heat about 3 cups of oil for cooking
Defrost Ravioli
Beat egg and milk together
Dip Ravioli in the milk and egg mixture and roll in bread crumbs
Cook the Ravioli in the oil


When the Ravioli is finished sprinkle with Parmesan Cheese and serve with spaghetti or marinara sauce.

Saturday, September 24, 2011

Sunday, September 18, 2011

Sugar Scrubs

Rainy Sunday afternoons usually mean that my two oldest boys spend their day in their room playing games together, my husband lays on the couch watching whatever game may be on TV and my youngest and I spend the day searching for something fun to do. 

Today we decided that we would make a Sugar Scrub.  I've seen random recipes around and all are easy enough.

2 1/2 cups of sugar
1 cup of olive oil
4 tablespoons of lemon juice

So we made up a batch and quickly ran up to the bath tub to give it a try on our feet.  The two of us rolled up our jeans and sat on the edge of the tub and began scrubbing.

Now, while the scrub does a good job exfoliating and the oil does leave your skin very soft, it smells terribly of olive oil and leaves an oil slick in your bath tub that can only be cleaned up with Dawn.  So I am not really in love with this recipe, even though it looks so cute in the jar.

My conclusion, olive oil is not a good oil for sugar scrubs.  It is too strong of a smelling oil and perhaps a little too heavy that it leaves a thick residue.

I did however have some sweet almond oil from some homemade lip balm experiments a few months ago so we decided to try our luck with another recipe.

1 cup of white sugar
1 cup of brown sugar
1 cup of sweet almond oil
vanilla
ground cloves
ground cinnamon
ground allspice

The second recipe was a little better.  It was a concoction of what we found in the kitchen that we thought would smell good together.  The almond oil is not as strong as the olive oil.  We used about a half tablespoon each of the cloves, allspice, cinnamon and a few drops of vanilla.

Our final try was not a sugar scrub.  We used epsom salt rather than sugar because the essential oils I had were eucalyptus and it just didn't sound like it belonged with sugar.  And essential oils rather than spices from the kitchen because I could still smell the almond oil although it is no where near as strong as the olive oil.

1 cup epsom salt
1/2 cup of sweet almond oil
a few drops of essential oils

All three recipes do a great job of exfoliating and leave your skin very soft and are easy to make.  But if you are looking for a spa like treatment with a pretty scent, do not use olive oil as many recipes suggest.


Saturday, September 17, 2011

Kitchen Progress

Over the past several weeks the kitchen has made some great progress.  It still has a long way to go but it is looking much better.  Almost like a real kitchen.

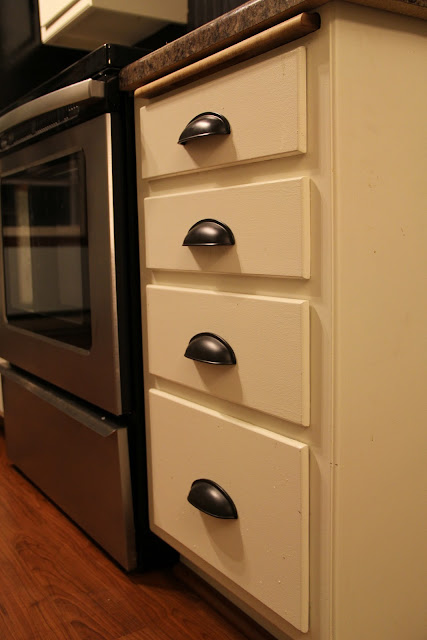
I decided I would try and salvage the cabinets before replacing them because they were structurally perfect.  I stripped away the yellow and blue paint and gave them a fresh coat of my favorite white paint.  New hardware has been added and it looks fantastic.  I love the look of the white cabinets with the dark hardware but I worry about white cabinets in a house with three boys.  I am constantly cleaning up spills or dirty fingerprints.


The new stainless steel appliances are fan-freaking-tastic.  LOVE!  Minus the fingerprints and constant cleaning and polishing.


And the new floor!  It couldn't be more perfect, the color and how it contrasts with the cabinets and appliances.  So pretty.


The new counters are also wonderful.  No more 1970's blue and gray speckled counter tops.

With any luck, this room may be completed by Christmas.

Wednesday, September 14, 2011

Our House

I thought I would share a few pictures of the inside of our house from the day we closed.  Again, keep in mind, this is what I enjoy to do so yes, I actually did pick this house.  My husband was talked into this by my explaining that we would be doubling our square footage, would have closets for everyone, an acre of yard and the big sell... he would no longer hit his head on fixtures or ceiling fans.  He's around 6'4 so our 8' ceilings in our old house were miserable for him.  Not to mention - this house was a STEAL!

This is our living room on the day we closed.

You can see some of the great features that drew me to this house.  The downstairs has all of the original woodwork still in place and it is beautiful, or will be someday.


The original front door from over a hundred years ago is still there.


Tons of windows and tons of natural light.  That also comes with tons of windows that need restoring but that's okay.  Or at least that's what I tell my husband.


The living room opens up to the dining room.  That filthy carpet was thrown away before we ever moved in.  But that woodwork is amazing.


This is the other side of the dining room.  It has a huge picture window.  It is ridiculously large.  I believe it is 8 feet tall and 8 feet wide.  I don't remember for sure... I just know it took me a million yards of fabric to make the curtains to cover it.  Notice the bushes outside the window.  The house was so neglected that the bushes were overgrown up to the second story.  The pile of junk is the tile and fixtures that I came armed with on day one.


I came with tile and fixtures because of this...


Not only the world's ugliest bathroom... but most disgusting on top of it!


Hard to believe that this is what I asked for isn't it?

Don't worry, the bathroom isn't there anymore.  I had it walls and all in a dump trailer by the end of the first weekend.

Monday, September 12, 2011

Goat's Milk Soap

I love Goat's Milk Soap.  It's rich, creamy and doesn't dry your skin like other soaps can.  For the past couple of years I have been making our own soap.  Well, sort of making.  Kind of cheating. 

After reading up on how to make my own soaps I quickly decided full blown homemade was probably not a viable option since this idea had actually started as a project to do with my boys.  Therefor completely homemade recipes with lye would not work.  It sounded like an accident waiting to happen. 

So I did further digging and found a company where you can purchase the soap bases.  Majestic Mountain Sage has a great variety of all soap bases reasonably priced.  http://www.thesage.com/ if you'd like to take a look.  They also offer fragrance oils and many other bath and soap making products not to mention... recipes.  

Fragrance oils I prefer to get from From Nature With Love.  I have never gone wrong with one of their fragrance oils.  Perfect every time.  If you've ever ordered oils of any kind online you know this can be 'hit or miss'.  http://www.fromnaturewithlove.com/ is their site.  Also fabulous and full of recipes.  Their oils are a little pricey but well worth the extra money to get it right the first time.

The soap making process with a premade base is very simple.

First chop your base into cube that are 2" or so each.

Then place your cut soap over a double boiler and begin the melting process.

I don't have a double boiler so configure my own with a ceramic bowl over boiling water.  The soap needs to be melted over indirect heat so this is a must.  The soap base will need to melt down fully to the consistency of milk.

If you would like to add color to your soap you can purchase additives to make colors.  (You MUST use colors made for soap making or your soap will color your skin - colors can be purchased at both sites I listed above.)  I prefer my soaps mostly white with just swirls of color.  To do this separate out a small amount of soap to add the color to and set it aside.  An old crockpot works great to keep the colored soap melted while waiting for the rest of the soaps to melt down.  I happened to have left over colored soap from previously so I just melted down my colors and saved what was left for next time.
Once the soap is melted you will need to move it to a mold.  This is my homemade mold because molds can be a little pricey.

Because the mold is homemade it must be lined... or it will spill out the bottom and all over the floor.  I know this for a reason.  I line my mold with a trash bag.  It does the trick.

Once the mold is properly lined gently pour the soap into the mold.  Slowly pouring the soap will avoid sudsing and a foam forming on the top of the soap. 

It is at this point you can add your fragrance oils.  I suggest adding oils during this step for two reasons, one is that you do not want to add your oils while the soap is at it's hottest point because the oils will cook off, second is that if you have cooked down too much soap base you can set it aside and let it cool down to keep for future scents.  How much oil is used is a personal preference.  I prefer my soaps to be heavily fragranced so I use approximately 1/2 oz for a full mold.
To get the marbled effect to your soap wait until the soap has cooled to the point of a stiff film or layer on the top, puncture the film the length of the soap and pour in the colored base.  Then gently swirl the colored base into the white.  A few gentle swirls is all you will need.  Too much swirling will cause too much mixing and then you will just have colored soap. 

After several hours of cooling you can remove your soap from the mold.  I cut my soaps with a butcher knife in no particular sizes.  They are only being used by my family so the soap cutters are not necessary for us.

When you are all done you have a beautiful batch of rich Goat's Milk Soap!

Just a quick side note... clean up of all dishes used making soaps is best done by first washing by hand.  If you choose to just quickly throw everything into the dishwasher keep a bottle of vinegar handy along with a full load of bath towels as the soap will suds like crazy causing a giant foam ball to roll out of your dishwasher making you feel like you are in an episode of The Brady Bunch.  Quickly before your husband notices douse the dishwasher in vinegar to neutralize the soap and sop up soap suds and water from the kitchen floor with bath towels.  My extreme hatred of washing dishes by hand has perhaps caused this to happen on a few occasions. 

Linking up to:
Just a Girl
Stuff and Nonsense
Under The Table and Dreaming

Sunday, September 11, 2011

Homemade Dishwasher Detergent

Over the past few years I have been on a personal boycott of Sam Walton's monopoly of a business.  This comes about for several reasons. 

First, my family was seeming to spend far too much money on nothing each time we walked in the door.  Seriously, any day I thought of going I should have just ran a hundred dollar bill threw a shredder.  It seemed that each time that was the minimum wasted amount. 

The second is that this one store has grown to be such a monopoly trying to dominate every market in America, pushing out and destroying smaller business such as grocery stores, pharmacies, optical centers and is now trying to tackle medical care.  My family has happened to run small family grocery stores for over 60 years.  While I have chosen to pursue other career paths, I feel it is important to support my family by shopping locally with them. 

Then there is the pollution, unfair wages and a multitude of other issues I have but I digress.

While shopping locally has proven to be wonderful for cost and time savings in most areas there are a few things that the smaller merchants just can not compete with price wise.  (This is the ticket to them luring you in the door - low prices on just a few items while overall, the prices are comparable for lesser quality products.)  One of these such items is dish washing detergent.  There is about a $4.00 a bottle difference in price. 

Because of my little boycott, my choice is I either suck it up and take three kids who will want $60 in toys in there for a $4 bottle of Cascade, buy the bottle at the local store for $8 or make my own for pennies.

I chose the latter.

Making dish washing detergent is so simple.  And most local grocery stores cary all of these items for their older customers who's business they rely on.  If you shop local and do not see them, ask.  Local merchants are always more than willing to stock something special to keep a customer. 

After a few google searches and finding it was possible I adjusted a few minor things to come up with the following recipe. 


1 Cup of Washing Soda
1 Cup of Borax
1/2 Cup of Salt (Kosher is best but I did not have any this time out and used regular Iodized salt and it works fine)
4 packets of Lemon aid Kool-Aid


Measure your ingredients and pour into a bowl in no particular order.  Be sure to smash out any clumps and stir together.


Place in an air tight container.  I prefer a mason jar because the dish washing soap is forever sitting on the counter at my house.  This way, it looks cute.

1 Tablespoon of dish washing soap per load of dishes.  Heavily soiled pots and pans you can add 2.  For an added all natural rinse agent - fill your dispenser with vinegar rather than JetDry. 

Perfect!  An all natural, environmentally friendly and inexpensive dish washing soap!

Linking up to:

Thursday, September 8, 2011

Mission Organization

Over the past few weeks I have been on a mission to organize my home and hopefully my life.  Okay, perhaps I should not say mission, a better term might be lackadaisical path.  To begin this organizing project I began with purging clothing.  The closets and drawers are much tidier now after removing dozens of bags of clothing to take to Goodwill. 

My next step is to tackle the kitchen and kitchen items.  While looking in my cupboards quickly last night to assess the damage something stuck out.  My dinnerware, glassware and flatware... it is all a mix of crap.  Broken and chipped dinnerware, odds and ends of glasses that together still do not make a full set, flatware with forks with bent tines and missing butter knives.  If someone were to come to my home for dinner I would be completely embarrassed.

After looking at my very neglected kitchen supplies I have decided the best way to organize this mess is to start over.  My goodness this is going to be a hefty shopping list.  Perhaps, I should not have neglected these utensils for so long.  And now, that I have finally made up my mind to replace all of this mess I am torn...

 Do I do something a little funky?

Something a little more muted but still fun?

Or something calming?


Tuesday, September 6, 2011

Table & Chairs!

This weekend I spent the majority of my time working in the kitchen.  It is coming along... slowly, but coming along. 

One item that really needed to be addressed was our kitchen/dining set.  Our old set was a square antique table that I had picked up at a yard sale years ago with chairs that I brought home from work.  I had been okay with this set for some time.  I liked the natural patina of the table after it's years of abuse and the chairs were a major upgrade next to what we had previously and I liked the look of the old with the new.

However, due to the logistics of our kitchen at this house the square table was not working out... at all.  Getting around the table was impossible and just too cramped.  So I decided I would look for a round pedestal table to fill this space.  Normally I have tons of these at work that can be given away for free but of course, once I was looking for one, there were none to be found.  So I started my search on Craigslist and found the perfect table for what I wanted to do.


Don't mind the pitching machine, bats, golf clubs, basketballs and other odds and ends on my porch.  I've given up asking for it to be put away for the summer.

I knew I wanted the pedestal of the the table to be black so I removed the top and took the base outside for a quick washing, sanding and a few coats of paint.


Once I put the table back together it was perfect.  I had thought about changing the top of the table to a darker stain but decided that I liked the color as is. 

After finishing the table I moved on to the chairs.
Please ignore the ugly chair in the background - it's a project sitting in my dining room that I intend on getting to some day - the Diego playing cards... I have no excuse.  They had been sitting on the floor for several days at this point.  But anyway... the green chairs... theses are a set of chairs that came from a very high end furniture store in our area a few years ago.  I scored them for free when the home they were in sold and the new owner wanted to dispose of them.  They are green with factory distressing, the food and slop marks are Coffey household destroying - it's kind of like distressing but without a stopping point.

After several really good scrubbings the chairs were finally able to be sanded and ready to paint.

I used my favorite black spray paint to do this.


And I think it turned out lovely.


Thursday, September 1, 2011

My Kitchen

When we bought this house we certainly weren't purchasing it for the house it was but for the house it could be. 

I have been working on the kitchen since about day... 3.  Six months later I am still not finished but am trying to get back on track.  There were several obstacles in the way on getting this project completed such as life in general.  At any rate, somewhere in the middle of the kitchen not being completed I completely switched gears on the direction of what I wanted.  This may or may not have been influenced by my husband telling me daily that he hated my wall color choice.

This is how my kitchen started.  Like I said... I was looking at the potential in the house.

Yes, those are Michigan blue and gold cabinets and walls.  Absolutely putrid.

This is the other side of the room.


Not any better I know.


This far end is our little kitchen eat in or dining area.  Looks just like something out of Better Homes and Gardens doesn't it!

Somewhere there is a 'what the heck did we do!' picture of my husband sticking his head in the itty bitty wall oven.  Yes, our closing day was special.